Foreword
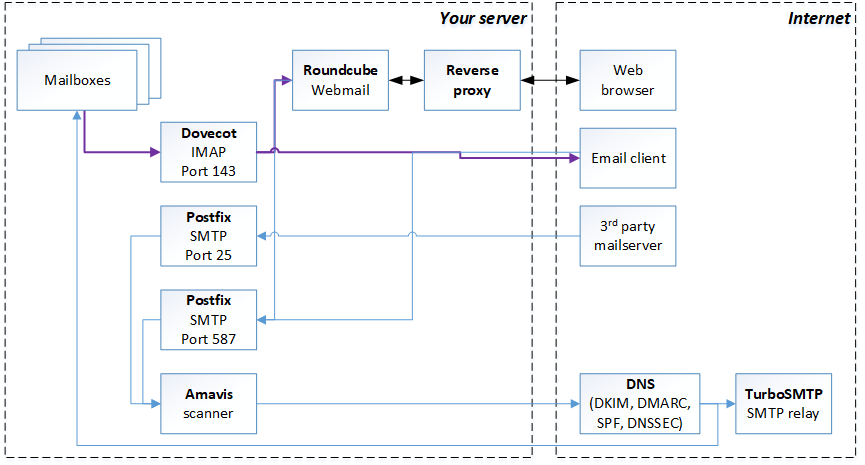
Setting up a modern, fully qualified mailserver with all the bells and whistles is no trivial task.
I tried to condense several hours of head banging into one, relatively simple and streamlined page you can follow by the letter, but it will still take you a good 1 or 2 hours.
In the end, however, you will have:
- an STMP server everyone (gmail.com, outlook.com, etc.) is happy to accept mail from and send mail to. Fully qualified, certified, secure, spam filtered etc.
- an IMAP server (that you may or may not want to port-forward to the internet..)
- a webmail server app you can plug into our beloved reverse proxy and open anywhere
 Back to top
DNS
Sadly, free sub-domains can't be used for mail servers; you'll have to purchase a domain, e.g. on Namecheap or Cloudflare.
Don't worry though, for they are cheap. Price ranges from 5 to 50 USD per year.
Once you purchase a domain, e.g. "appleandpears.co.uk", that will be "your domain" as it appears throughout this page.
This is an example of a DNS management dashboard:
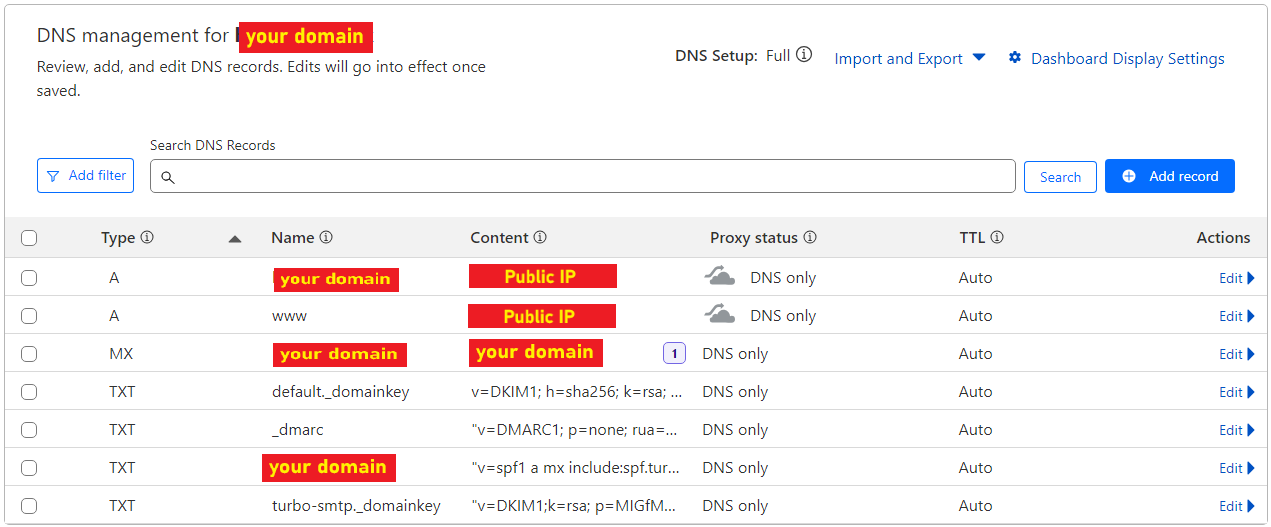
Start by creating:
- an A type domain with name=@ and Content=<your public IP>
- an A type domain with name=www and Content=<your public IP> - This is optional, only if you want www.<your domain> for your webserver like me
- an MX type domain with name=@ and Content=<your domain>
- a TXT type domain with name=@ and Content="v=spf1 mx ~all"
Back to top
Dovecot
I decided to forget about POP3 as it's ancient and cumbersome. Just sudo apt install dovecot-imapd
Then just do the following to enable authentication:
sudo nano /etc/dovecot/conf.d/10-master.conf
# In the "service auth" block
  # Postfix smtp-auth
  unix_listener /var/spool/postfix/private/auth {
    mode = 0666
    user = postfix
    group = postfix
  }
sudo nano /etc/dovecot/conf.d/10-auth.conf
auth_mechanisms = plain login
disable_plaintext_auth = no
Restart dovecot: sudo systemctl reload dovecot
Back to top
Postfix, Amavis
First of all, install everything
sudo apt install postfix amavis
- choose "2) Internet site" as the configuration type
- enter your domain as the "server name"
Postfix
Edit /etc/postfix/main.cf and adjust the following settings (NOTE: some will already exist, some need to be added):
smtpd_tls_cert_file=/etc/letsencrypt/live/<YOUR DOMAIN>/fullchain.pem
smtpd_tls_key_file=/etc/letsencrypt/live/<YOUR DOMAIN>/privkey.pem
myhostname = <YOUR DOMAIN>
relayhost = pro.eu.turbo-smtp.com:587
smtp_sasl_auth_enable = yes
smtp_sasl_password_maps = hash:/etc/postfix/sasl_passwd
smtp_sasl_security_options =

smtpd_sasl_security_options = noanonymous
smtpd_sasl_type = dovecot
smtpd_sasl_path = private/auth
tls_ssl_options = NO_COMPRESSION, NO_RENEGOTIATION

policyd-spf_time_limit = 3600
smtpd_recipient_restrictions =
   permit_mynetworks,
   permit_sasl_authenticated,
   reject_invalid_hostname,
   reject_unauth_pipelining,
   reject_non_fqdn_sender,
   reject_unknown_sender_domain,
   reject_non_fqdn_recipient,
   reject_unknown_recipient_domain,
   reject_unauth_destination,
   check_policy_service unix:private/policyd-spf,
   reject_rbl_client bl.spamcop.net,
   reject_rbl_client cbl.abuseat.org,
   reject_rbl_client ix.dnsbl.manitu.net,
   reject_rbl_client sbl.spamhaus.org,
   reject_rbl_client zen.spamhaus.org,
   reject_rbl_client b.barracudacentral.org,
   reject_rbl_client bb.barracudacentral.org,
   permit

milter_default_action = accept
milter_protocol = 6
smtpd_milters = local:opendkim/opendkim.sock
non_smtpd_milters = $smtpd_milters
Now edit /etc/postfix/master.cf and paste this at the bottom:
smtp            inet  n       -       n       -       -       smtpd
  -o smtpd_helo_required=yes
  -o disable_vrfy_command=yes
  -o content_filter=smtp-amavis:[127.0.0.1]:10024

submission      inet  n       -       n       -       -       smtpd
  -o syslog_name=postfix/submission
  -o smtpd_tls_security_level=encrypt
  -o smtpd_sasl_auth_enable=yes
  -o smtpd_tls_auth_only=yes
  -o smtpd_reject_unlisted_recipient=no
  -o smtpd_relay_restrictions=permit_sasl_authenticated,reject
  -o milter_macro_daemon_name=ORIGINATING
  -o disable_vrfy_command=yes
  -o content_filter=smtp-amavis:[127.0.0.1]:10026

smtp-amavis     unix  -       -       n       -       2       smtp
  -o smtp_data_done_timeout=1200
  -o smtp_send_xforward_command=yes
  -o disable_dns_lookups=yes
  -o max_use=20

127.0.0.1:10025 inet  n       -       n       -       -       smtpd
  -o content_filter=
  -o local_recipient_maps=
  -o relay_recipient_maps=
  -o smtpd_restriction_classes=
  -o smtpd_delay_reject=no
  -o smtpd_client_restrictions=permit_mynetworks,reject
  -o smtpd_helo_restrictions=
  -o smtpd_sender_restrictions=
  -o smtpd_recipient_restrictions=permit_mynetworks,reject
  -o smtpd_data_restrictions=reject_unauth_pipelining
  -o smtpd_end_of_data_restrictions=
  -o mynetworks=127.0.0.0/8
  -o smtpd_error_sleep_time=0
  -o smtpd_soft_error_limit=1001
  -o smtpd_hard_error_limit=1000
  -o smtpd_client_connection_count_limit=0
  -o smtpd_client_connection_rate_limit=0
  -o receive_override_options=no_header_body_checks,no_unknown_recipient_checks,no_milters
  -o local_header_rewrite_clients=
  -o smtpd_milters=

policyd-spf     unix  -       n       n       -       0       spawn
  user=policyd-spf argv=/usr/bin/policyd-spf
Restart postfix: sudo systemctl reload postfix
Amavis
Edit /etc/amavisd/amavisd.conf or /etc/amavis/conf.d/50-user (whichever exists) and insert this:
$mydomain = '<YOUR DOMAIN>';
$enable_dkim_verification = 1;
$enable_dkim_signing = 1;
$sa_tag_level_deflt  = -999;
virus_admin_maps => ["postmaster\@$mydomain"],
spam_admin_maps  => ["postmaster\@$mydomain"],
$virus_admin               = "postmaster\@$mydomain";
$mailfrom_notify_admin     = "postmaster\@$mydomain";
$mailfrom_notify_recip     = "postmaster\@$mydomain";
$mailfrom_notify_spamadmin = "postmaster\@$mydomain";
$recipient_delimiter = '+';
$myhostname = '<YOUR DOMAIN>';
$notify_method  = 'smtp:[127.0.0.1]:10025';
$forward_method = 'smtp:[127.0.0.1]:10025';
$final_spam_destiny        = D_DISCARD;
$spam_quarantine_to = undef; # Do nothing with Spam
$inet_socket_port = [10024,10026];  # listen on multiple TCP ports
$interface_policy{'10026'} = 'ORIGINATING';
$enable_dkim_verification = 1;
$enable_dkim_signing = 1;
$policy_bank{'ORIGINATING'} = {  # mail supposedly originating from our users
    originating => 1,  # declare that mail was submitted by our smtp client
    allow_disclaimers => 1,  # enables disclaimer insertion if available
    # notify administrator of locally originating malware
    virus_admin_maps => ["postmaster\@$mydomain"],
    spam_admin_maps  => ["postmaster\@$mydomain"],
    warnbadhsender   => 1,
    # forward to a smtpd service providing DKIM signing service
    forward_method => 'smtp:[127.0.0.1]:10025',
    # force MTA conversion to 7-bit (e.g. before DKIM signing)
    smtpd_discard_ehlo_keywords => ['8BITMIME'],
    bypass_banned_checks_maps => [1],  # allow sending any file names and types
    terminate_dsn_on_notify_success => 0,  # don't remove NOTIFY=SUCCESS option
};
and restart amavis: sudo systemctl restart amavis
SPF (Sender Policy Framework) and DKIM (DomainKeys Identified Mail)
Install the SPF filters and DKIM tools:
sudo apt install postfix-policyd-spf-python opendkim opendkim-tools
Add the postfix account to the "opendkim" group
sudo gpasswd -a postfix opendkim
Now edit the main opendkim config file and edit as described below: sudo nano /etc/opendkim.conf
Syslog               yes
UMask                007
Canonicalization     relaxed/simple
Mode                 sv
SubDomains           no
AutoRestart          yes
AutoRestartRate      10/1M
Background           yes
DNSTimeout           5
SignatureAlgorithm   rsa-sha256
Socket               local:/var/spool/postfix/opendkim/opendkim.sock
PidFile              /run/opendkim/opendkim.pid
OversignHeaders      From
TrustAnchorFile      /usr/share/dns/root.key
UserID               opendkim
KeyTable             refile:/etc/opendkim/key.table
SigningTable         refile:/etc/opendkim/signing.table
ExternalIgnoreList   /etc/opendkim/trusted.hosts
InternalHosts        /etc/opendkim/trusted.hosts
sudo mkdir -p /etc/opendkim/keys
sudo chown -R opendkim:opendkim /etc/opendkim
sudo chmod go-rw /etc/opendkim/keys
sudo nano /etc/opendkim/signing.table
*@your-domain.com    default._domainkey.your-domain.com
*@*.your-domain.com    default._domainkey.your-domain.com
sudo nano /etc/opendkim/key.table
default._domainkey.your-domain.com your-domain.com:default:/etc/opendkim/keys/your-domain.com/default.privatesudo nano /etc/opendkim/trusted.hosts
127.0.0.1
localhost
.your-domain.com
sudo mkdir /etc/opendkim/keys/your-domain.com
sudo opendkim-genkey -b 2048 -d your-domain.com -D /etc/opendkim/keys/your-domain.com -s default -v
sudo chown opendkim:opendkim /etc/opendkim/keys/your-domain.com/default.private
sudo chmod 600 /etc/opendkim/keys/your-domain.com/default.private
Now dump the DNS "blob": sudo cat /etc/opendkim/keys/your-domain.com/default.txt
copy&paste everything between parenthesis () into a TXT record named "default._domainkey" on your DNS dashboard.
Test the key: sudo opendkim-testkey -d your-domain.com -s default -vvv should print something like:
opendkim-testkey: using default configfile /etc/opendkim.conf
opendkim-testkey: checking key 'default._domainkey.<YOUR DOMAIN>'
opendkim-testkey: key secure
opendkim-testkey: key OK
sudo mkdir /var/spool/postfix/opendkim
sudo chown opendkim:postfix /var/spool/postfix/opendkim
sudo nano /etc/default/opendkim
...
SOCKET="local:/var/spool/postfix/opendkim/opendkim.sock"
...
Restart postfix and opendkim: sudo systemctl restart opendkim postfix
SMTP relay
Unfortunately, all the effort to set up a secure and identifiable server does not grant acceptance from "official" mailservers like GMail or even Protonmail.
If you're using a common home internet connection, and you haven't paid for a static IP, chances are your IP will be globally blacklisted for spam.
If you paid for a static IP, you might still have to have it whitelisted. If you're successful at that or just want to try your luck, you can blank the relay host ("relayhost =") in /etc/postfix/main.cf and ignore the following.
Otherwise, postfix is already geared up to use TurboSMTP as an STMP relay, you just need "app" credentials.
TurboSMTP is the first one I tried that is free and just works out of the box.
Start by signing up on https://serversmtp.com/, then wait for the confirmation email with all the instructions.
Then store the credentials in a new file sudo nano /etc/postfix/sasl_passwd like so:
pro.eu.turbo-smtp.com <TurboSMTP login:<plain password>and rehash the file: sudo postmap hash:/etc/postfix/sasl_passwd (no need to restart postfix).
The email should contain instructions on how to further edit your DNS TXT records to accommodate TurboSMTP, namely:
- edit the TXT type domain with name=@ and set Content="v=spf1 a mx include:spf.turbo-smtp.com ~all"
- add a TXT type domain with name=turbo-smtp._domainkey and Content=<from the registration email>
Email accounts
This setup uses system accounts as email accounts.
To enable mail access for an account:
sudo usermod -aG mail $(whoami)
To create a new system account with mail access:
sudo useradd -m -G mail -s /bin/bash <ACCOUNT NAME>
sudo passwd <ACCOUNT NAME>
Testing
You can check if your installation is working by sending an email with this python script:
import smtplib, ssl
import email.utils as utils

from email.message import EmailMessage
from datetime import datetime


server_fqdn = '<YOUR DOMAIN>'
server_user = '<YOUR LOGIN>'
server_pass = '<YOUR PLAIN PASSWORD>'

msg = EmailMessage()
msg.set_content(f"""
Multiline email body.
By yours truly.
Best regards
""")
msg['Subject'] = 'Email subject'
msg['message-id'] = utils.make_msgid(domain=server_fqdn)
msg['From'] = f'@{server_fqdn}'
msg['Reply-to'] = f'{server_user}@{server_fqdn}'
msg['date'] = datetime.now()
msg['To'] = [
    'recipient1@gmail.com',
    'recipient2@gmail.com',
    # ...
]

context=ssl.create_default_context()
with smtplib.SMTP(server_fqdn, 587) as server:
    server.set_debuglevel(1)
    server.starttls(context=context)
    server.login(server_user, server_pass)
    server.send_message(msg)
Or, if you're not a python fan, you can sudo apt install mailutils and use the "mail" utility to send and receive emails.
I actually don't have a python script to receive emails but I'd suggest the check the next chapter (Webmail) instead.
Postfix, amavis, dovecot and all the others' logs are your friends when it comes to debugging SMTP/IMAP issues.
You can follow them with journalctl -f
Back to top
Webmail with Roundcube
Roundcube comes as a docker image which works perfectly well for our server.
You have the option of not forwarding port 143 and use the server's IP address instead of your domain to load inboxes:
docker run --detach \
   --env ROUNDCUBEMAIL_DEFAULT_HOST=<SERVER IP> \
   --env ROUNDCUBEMAIL_DEFAULT_PORT=143 \
   --env ROUNDCUBEMAIL_SMTP_SERVER="tls://<YOUR DOMAIN NAME>" \
   --env ROUNDCUBEMAIL_SMTP_PORT=25 \
   --env ROUNDCUBEMAIL_REQUEST_PATH=/roundcube/ \
   --publish <ARBITRARY SYSTEM PORT>:80 \
   --name roundcube \
   --restart always \
   --volume /<ARBITRARY SYSTEM PATH>/html:/var/www/html \
   --volume /<ARBITRARY SYSTEM PATH>/config:/var/roundcube/config \
   --volume /<ARBITRARY SYSTEM PATH>/db:/var/roundcube/db \
   roundcube/roundcubemail:1.6.9-apache
However, when you first login, your identity will be set to <account>@<server IP> and will fail to load the inbox and send mail.
This can easily be fixed by going to Settings (left pane) -> Identities -> and changing the Email to <account>@<your domain>.
The ROUNDCUBEMAIL_REQUEST_PATH can be anything, probably "mail" is a better choice -easier to remember, rather than the software than runs underneath.
You can plug it into NGINX by adding the following to the main "server" block in /etc/nginx/sites-available/default (remember to change "roundcube" to whatever ROUNDCUBEMAIL_REQUEST_PATH is):
    location /roundcube
    {
        proxy_http_version 1.1;
        proxy_set_header Upgrade $http_upgrade;
        proxy_set_header Connection "Upgrade";
        proxy_set_header Host              $http_host;
        proxy_set_header X-Real-IP         $remote_addr;
        proxy_set_header X-Forwarded-For   $proxy_add_x_forwarded_for;
        proxy_set_header X-Forwarded-Proto $scheme;
        proxy_set_header Accept-Encoding "";
        proxy_set_header X-NginX-Proxy true;
        add_header   Front-End-Https   on;
        proxy_connect_timeout     600;
        proxy_send_timeout        600;
        proxy_read_timeout        600;
        location /roundcube/ {
            rewrite    /roundcube/(.*) /$1 break;
            proxy_pass http://<SERVER IP>:<ARBITRARY PORT>/;
        }
    }
Comments